Sunday, June 30, 2019

A Little Miscellaneous Post

Hi, everyone!  I keep meaning to mention the topic of pens to you.  I've never had great luck with marking pens on fabric - either they don't come out, they come out before you want them to come out, or I can't see them.  I usually end up using a pencil or for dark fabric, chalk.  Obviously the problem with chalk is it comes off very easily.  I mean, that's a plus, too, but it makes it hard to mark a whole top, you know?  Then ... I finally discovered the Frixion pens!  Where have these been all my life?

IMG_8907PenMarks
I initially took this shot because my bobbin ran out THREE INCHES from the end,
but I thought it was a good look at the pen markings!

I bought a set off Amazon - blue, black, pink, and white. WHITE! It takes a few seconds for the white to show up, but then there it IS! And it all stays on until you hit it with an iron. Totally awesome! If you haven't tried these out yet, please do. You won't be sorry!

I also had promised to show you the Wonky Army Star quilt once it was hung up! We put it at the bottom of the stairs. It's a bright, open area and some of my husband's military things are already on a shelf there. Perfect!

IMG_9112WonkyArmyStar

It would have been too dark in his study, but this way, we can both enjoy it every time we head down the stairs!

I'll have a couple more updates for you soon!

As always, thank you for reading!
KZK

Saturday, June 29, 2019

Forgotten Pyramids

Many thanks to my friends for helping me name this one.

IMG_9177ForgottenPyramidsReadyToQuilt
Forgotten Pyramids

It was another one in the stack of "UFOs" that really needed to be quilted, bound, and hung! I remember piecing it ... I just can't exactly remember when it was. Yikes. Let's just say it was quite a while ago!  All of the triangles are from fabric samples a friend and I used to get when we lived in Korea from a shop in Texas.  I think I pieced it after we left there ... maybe while we were living on Fort Riley, KS?  '97?  '98?  Somewhere around there!

I quilted a diamond grid on it, then quilted a free-form rope in the borders. I decided to do the "sew the binding to the back, then bring it to the front to machine stitch" method. Sewing from the FRONT. I am SO MUCH happier doing it this way!

IMG_9194ForgottenPyramidsBinding
Sew to the back first, then bring it around to the front

Sure, my stitching shows, but it's all part of the "framing", right? I used the same thread I quilted with, so ... whatever. I'm happy.

I put little sleeves on the back that sewed right into the binding. I'll slip a tiny dowel through it to hang.

IMG_9193ForgottenPyramidsHangingSleeves

Yes, I had to hand-stitch the bottoms, but it takes like 5 minutes.

Action shot:

IMG_9196ForgottenPyramidsBinding

I sewed as close to that folded edge as I could.  So much easier for me!

Here's a close up of a corner:

IMG_9197ForgottenPyramidsBindingDetail

Nice and crisp. Whew.

For the record, I don't think there's a "wrong" way to do the binding. This just is working best for me right now!

All done and ready to hang:

IMG_9200ForgottenPyramids

I just don't quite know where that will be yet, so it's hanging out with the LPs:

IMG_9246ForgottenPyramids

It really feels great to finish some of these old projects! This one has such a nice "warm Autumn" feel to it.  It will fit in a number of places!

Thank you all for reading! I truly appreciate it!
KZK

Thursday, June 27, 2019

Camp Casey Quilt - Done and Hung!

Hi everyone!  Another quilt I wrapped up is the Camp Casey quilt I showed you a little bit ago!  Here's a shot, binding on and after a nice wash:

IMG_9090CampCaseyQuiltMags

I'm very happy that my many, many pencil lines came out nicely.

Whew.

Detail shot of some of the quilting:

IMG_9091CampCaseyQuilt

How about a look at the back?

IMG_9092CampCaseyQuiltReverseMags

You can tell that Maggie is impressed, can't you?

Here's a close up:

IMG_9094CampCaseyQuiltReverse

I'm really happy with my combination of straight-line quilting, other walking foot work, and free-motion quilting. And I LOVE the King Tut thread! (Sands of Time. Love it!!!)

And here it is, at home in my husband's office:

IMG_9153CampCaseyQuiltHung

I was going to hang the Wonky Army Star Quilt there, but was afraid it would make the room too dark. This is a perfect fit!

I love finishing up any project, but especially love finishing "old" ones!

Thanks so much for reading!
KZK

Wednesday, June 26, 2019

It Starts With A Pair Of Pants ...

Hi everyone!  Sorry I dropped off for a bit there!  Today I'd like to show you a fun bag I made for a friend of mine.  She had admired the denim purse I was carrying ... so I offered to make her one.  Not necessarily one like it, but a bag.  (Just as a gesture, one friend to another; I'm not going back into the "business"!). So ... as the title of this post states, it starts with a pair of pants!

IMG_9077FutureBag

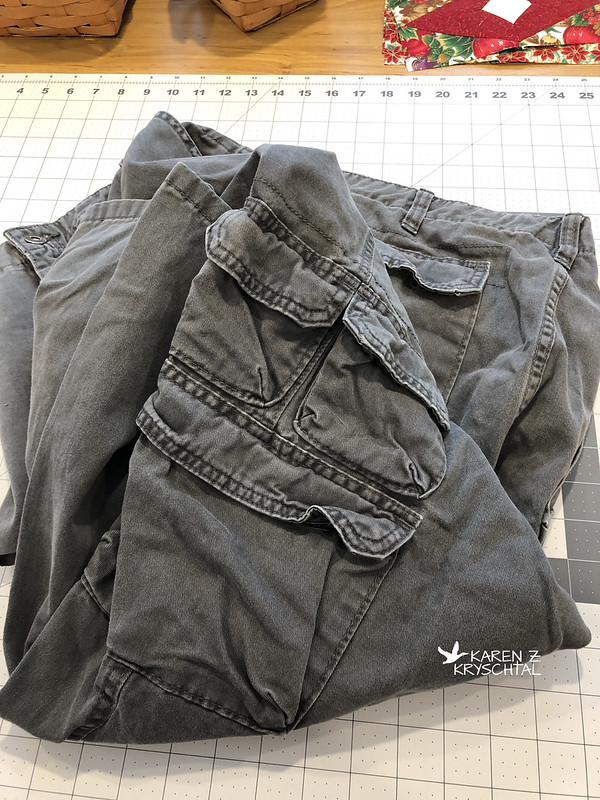
They were my husband's. I'm sure he was done with them. At least he is now. 😀. No, really. He was. They are nice, sturdy pants made from a lovely sort of brushed denim? I'm not sure. But very soft yet strong fabric. And LOTS of pockets! I ❤️ pockets!

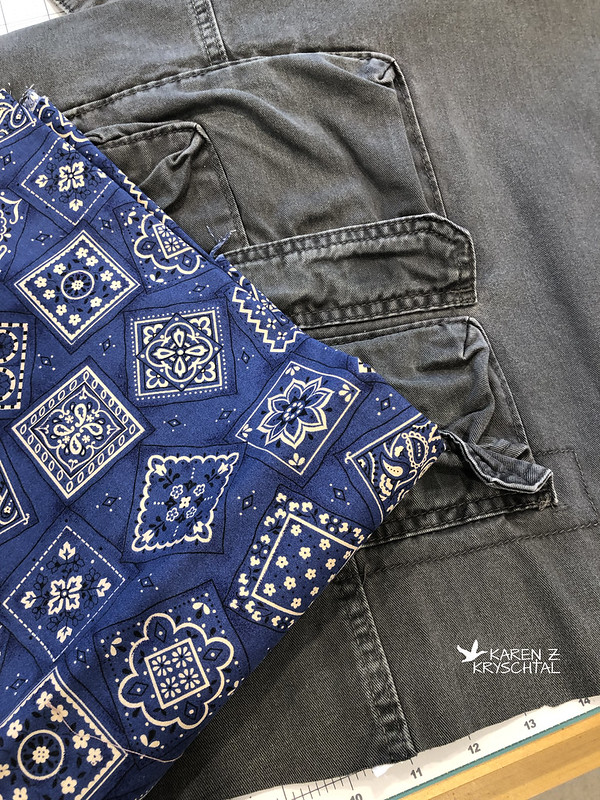
My friend spends a lot of time outdoors - she's my birding buddy, plus she is out with her Border Collies a lot, does a lot of hiking, etc. I wanted something pretty, yet functional and sort of outdoorsy.  I thought this fabric was perfect for the lining:

IMG_9078BethsBagLining

And what goes together better than grey and blue?!?  OK, maybe blue and white, but let's move on!

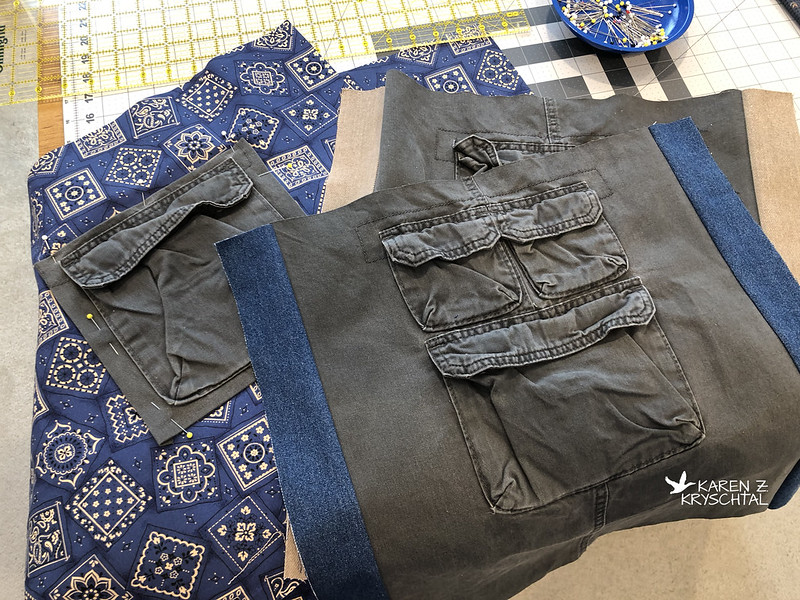
I cut a nice large rectangle around some of the pockets.  I wanted the bag to be a bit larger, so I added some denim panels to the sides.  I also cut two other pockets out to use inside the bag:

IMG_9135BethsBagPanels

It seemed like a good plan!

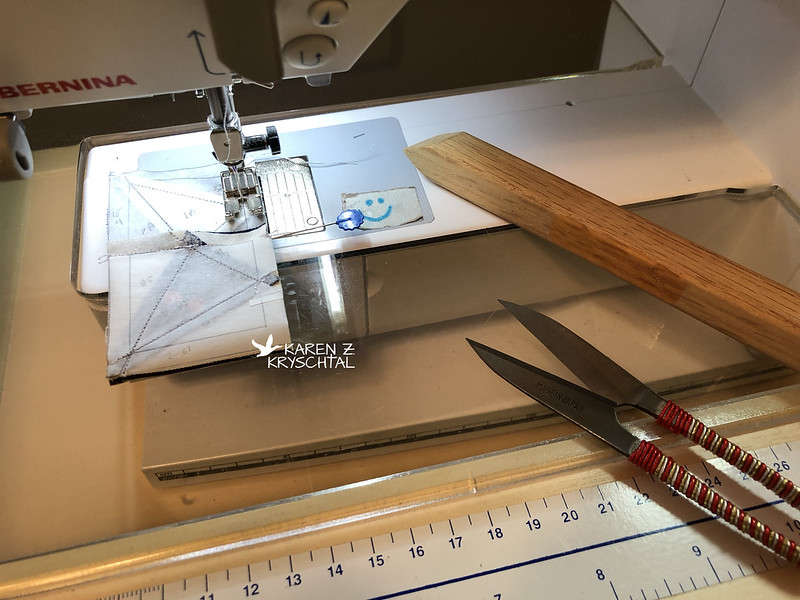
I used a variegated black to white thread to sew the pockets onto the lining, and to do a little quilting:

IMG_9136BethsBagInsidePocket

You can't see it there, but I also decided since the bandana-looking fabric was quilt-weight cotton, I should put some interfacing on it.  I used some fusible that I have.  It no longer fuses.  That could have been why I did some quilting on the inside.

Anyway, panels all set and ready to build a bag:

IMG_9138BethsBagGuts

Honestly, men's pants have the BEST pockets!  There were all sizes; I used as many as I could!

Here's one side of the bag, pinned to the ZIPPER (I know!) and set to sew:

IMG_9137BethsBagLiningBack

Obviously, you can see my non-fused fusible interfacing there.  I also put two lines of stitching at the bottom of every pocket, just for added strength.

Here's an action shot:

IMG_9155BethsBagConstruction
Pins are your friends; just don't sew over them.

I was watching a quilt video the other morning while I was tread-milling and all I could think was, "Wow, she uses almost as many pins as I do!"  LOL.  Seriously.  I must pin.

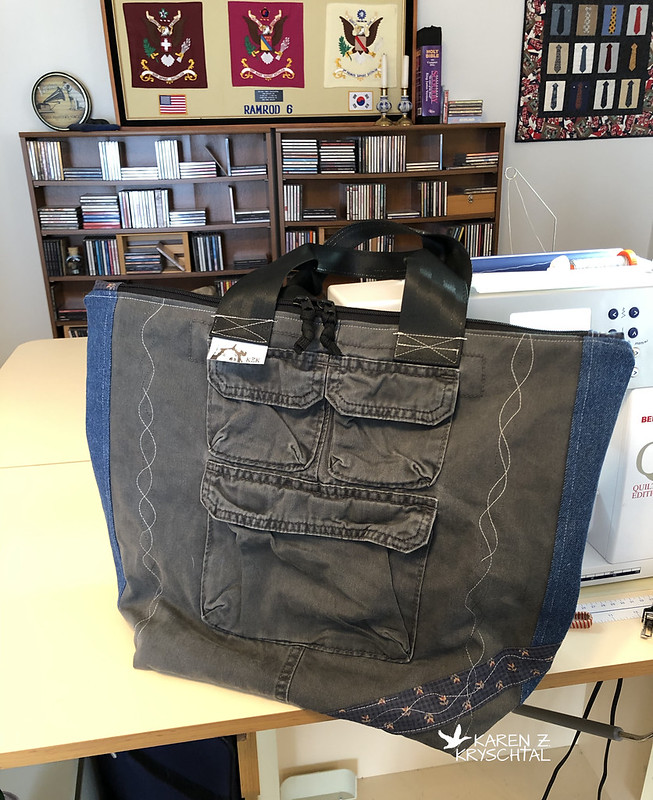
Ready for the "ta-da moment"?  Here it is:

IMG_9172BethsBagFront

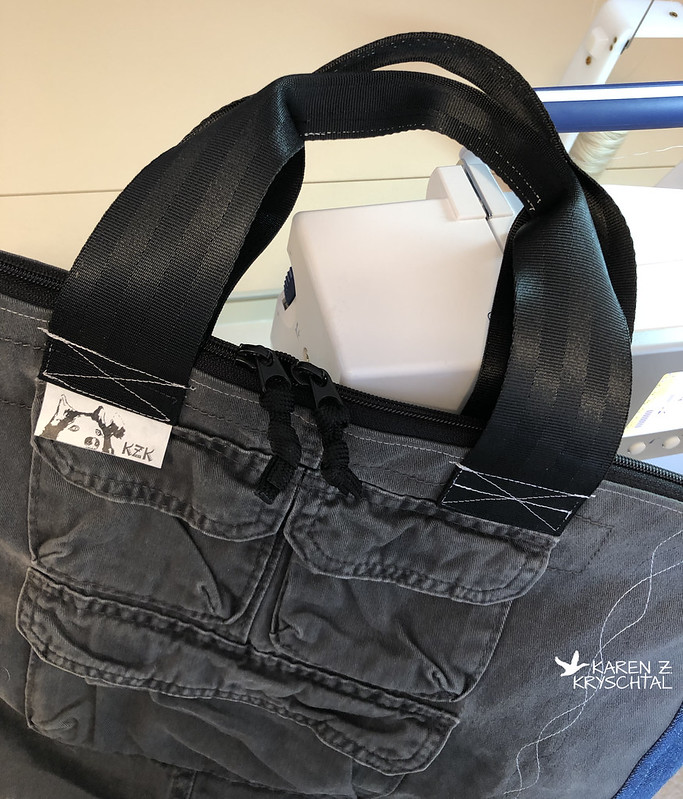
Very pleased with how it came together.  Here is a closer look at the "grab and go" straps:

IMG_9173BethsBagHandles

They are extra-wide, then I sewed them in half so they'd be more comfy to hold onto.  They are made from seatbelt webbing.

And look at that double zipper!!!  I think it's from an old backpack.

Here's the other side of the bag:

IMG_9174BethsBagBack

And finally, a peek inside:

IMG_9175BethsBagInside

You can't have too many pockets - right?!?

I had a blast making this!  It was a total free-form kind of thing - I had no plan, just used what I had and had fun with it.  What a great project!  I hope my friend likes using it as much as I liked making it!

Thanks for reading!
KZK

Friday, June 21, 2019

Kansas Dugout Scrap String Quilt - DONE!

Hi everyone!  Remember the Kansas Dugout quilt I finished piecing back in January?  January?!?  I thought it was way more recently than that, but there you go.  Anyway - I finished quilting it and binding it a few weeks ago and thought I'd show you how it turned out.

Here it is, once I quilted and trimmed it:

IMG_8910KansasDugoutScrapStringQuilt

I agonized over how to quilt it, then realized I LOVE doing the wavy lines. I mean LOVE doing them. So you know ... why not?

I dug into my 2.5" scrap basket for the binding:

IMG_8996KansasDugoutScrapStringQuilt

I also pieced the back:

IMG_8997KansasDugoutScrapStringQuilt

A Kansas Dugout quilt calls for two different sunflower-themed fabrics, don't you think?

I decided to go with the "sew to the front, pull around to the back, but still sew from the front to secure the part in the back" method, like I did on the runner.  I used a lot of pins this time, so I wouldn't miss the fold in the back.

IMG_9036KansasDugoutScrapStringQuilt

The front looks OK:

IMG_9037KansasDugoutScrapStringQuilt
Sunflower binding meets sunflower scrap.  💛


But I had too much flap past my stitching line in the back, if that makes sense.  Here's a look at the back:

IMG_9038KansasDugoutScrapStringQuilt

And yet, it got the job DONE!!!  Take a gander:

IMG_9040KansasDugoutScrapStringQuilt

As you can see by the Pickle, I had some help in the Studio.

Here's the back:

IMG_9044KansasDugoutScrapStringQuilt

It feels good to have another old project DONE!

Thanks for reading!
KZK

Monday, June 10, 2019

Christmas String Quilt Runner

Hi everyone!  Another old project wrapped up!  I showed you the Christmas String Runner Quilt a while back -- it was another project I started who knows when!  I practiced my free-motion quilting on it, sewed a binding to the front ... then put it in the "hand sewing" pile.  That pile moves slowly.

I watched another tutorial about doing the binding totally by machine and thought I'd give this method a try.  Unlike the camo quilt I made for the girls, this method has you sew to the front like I normally do, then sew from the front again - carefully making sure you catch the binding on the back.  I HAD to try it out!

I went slowly, being as careful as I could be, and before I knew it ...

IMG_8887ChristmasStringQuiltRunner

Yeah!  Of course, I missed the binding in a couple spots (OK, more like 5 or 6), but for a first effort, not too bad!  I went back and fixed those areas and I was good to go!

Here's a look at the back:

IMG_8889ChristmasStringQuiltRunnerBack

I'm so pleased to wrap up another unfinished project - and in this one, learned a new-to-me binding technique and practiced my free-motion quilting!

Thanks for reading!
KZK

Late edit:  I'm giving this to my friend Beth for Christmas!

Saturday, June 8, 2019

The Hunt Continues

Hi everyone!  For several days there, I was full-steam ahead on my Hunter's Star blocks!  As I mentioned, one of the keys for me has been staying organized.  It may not look like it, but this is my version of an organized work area:

IMG_8702OrganizedChaos

All the blocks are labelled, stacks of 5" cut squares for both the HSTs and the 4-patches, everything nice and handy.  Call it "organized chaos".

I reached a point where I needed a very large surface to see my progress. The only area big enough was in our "Gallery" area, sort of an open area between my Studio and the Library. I gave the tiles a quick vacuum, then laid out what I had:

IMG_8770MagsHuntersStar

Maggie supervised, as you can see. And did not walk across the blocks. Good puppy!

I was happy with my progress and dove back in.

More HSTs to trim up:

IMG_8846SquaringUpHSTs

The hideous green/yellow print in the background may well end up being one of my borders.  Eek.

I found that I was most comfortable making 2-3 blocks at a time, in different stages of piecing. Sure, I could have chain pieced everything, but then I would have had to trim up 89 million HSTs (pretty sure that's how many go into this quilt) at one standing, and ... no. It was more interesting for me to break things up.

Before too long, I had ALL my blocks pieced!

IMG_8848HuntersStarMaggie

Apparently Mags was confident enough with my performance that she could engage in other activities.

That's as much as I have right now. I knew we'd be having workers in the house all day for a few days, so I knew I'd be interrupted. I didn't want to have to lay everything out, then pick it back up - and repeat. Once I have a good stretch where I can knuckle down and do it, I'll get my rows put together!

Have I mentioned this thing is huge? It's going to look smashing in one of the guest rooms!

Thanks for reading!
KZK

Friday, June 7, 2019

Hunter's Star Tips

Hi everyone!  As promised, here are some helpful tips while working on the Hunter's Star quilt.

1.  Watch Jenny's video as frequently as needed.  Seriously.  I have the Quilt Tutorials app from Missouri Star Quilt Co. on my iPhone and I buzz in there when I'm having one of those "what in the WORLD" moments.  Jenny makes me feel better.

2.  Remember - there are no mistakes!  Just ... creative personalizations. Like if your ruler slips and you don't have any spare of "that" brown - use another brown!

IMG_8650CreativePersonalization

Maybe that's the beauty of Civil War repro fabs -- it's what they would have done in the mid 19th century.

3. Speaking of rulers slipping, have you ever watched tutorials by Donna Jordan of Jordan's Fabrics? She, like Jenny Doan, has some great tutes. When cutting long strips, Donna often puts a hand weight at the end of her 24" ruler. I thought that was a great idea, so I grabbed the heaviest thing I had handy:

IMG_8699RulerWeight

I keep my jar of marbles close by. You know. So I know I haven't lost them.

Yet.

Anyway, when you're cutting long strips, it's a splendid idea to have a weight on the end of your ruler.

4. This quilt is a bit challenging, but don't let it bog you down! Keep it fun! Listen to Samba music, have a fizzy water handy, and delight in the small things that make you smile.

IMG_8737HuntersStarDetail
BIRDIE!!!

5. Speaking of things that make me smile ...

IMG_8701HuntersStarBlocksMaggie

Stay amused! (Thanks, Mags!).

6.  And stay organized! Print out the block diagrams on the Missouri Star Quilt Co. site, use sticky notes to keep the blocks labelled (they really start to look alike after a while), and keep a running tab of how many of each you've done! I also wrote directions to myself as to which way to press each step, so everything would nest together nicely!

IMG_8831HuntersStarBlocks

And 7. If you're trying to use up fabric that you haven't looked at in a long time, give it a hard look! I actually allowed myself to throw some away - having learned my lesson about cheap fabric. I also remembered why I fell in love with certain fabs:

IMG_8704HuntersStarBlockDetail

The fab in the upper right has so much that I love -- khaki, OD green, blue ... who could ask for more?!?

That's it so far.  I'm also starching these, as there are so many bias edges.  It helps lock things together.  Or something like that.  I also learned not to hold and open the starch bottle with one hand, as that's apparently a good way to spray yourself in the face.  Who knew?  Maybe that should be tip #8.  Starch your blocks, not your face.  LOL.

Thanks for reading!  More progress reporting soon!
KZK

Thursday, June 6, 2019

The Hunt Begins!

Hi everyone!  Have you watched any of Jenny's tutorials over at the Missouri Star Quilt Company?  She makes everything look so easy and fun!  I saw her tutorial on the Hunter's Star and knew I wanted to give it a go.  I love the "pattern in a pattern" thing and just the whole look of it!

I put it out to some friends and one or two might be giving it a try.  I couldn't wait to give it a go!  My plan was to use fabric I have on hand, and I thought this would look so beautiful in batiks!  Only ... somehow I grabbed my Civil War reproduction fabrics instead and started cutting.  How does that even happen?  Oh well.  Very fitting, since it's an old pattern!

I watched Jenny two or three times, printed out the block layouts, and got to work.  Before I knew it, I had my first "A Block" and a 4-Patch.

IMG_8623HuntersStarBlocks

Then I tried a "B Block" and another 4-Patch, so I could start to see the pattern.

IMG_8634HuntersStarBlocks

If you squint and look at the center of that photo above, you can see two arrows formed - one in the muslin, one in the prints.  Can you see it?  As I get things together, it will become more evident!

There are a lot of half-square triangles (HSTs) involved, and Jenny has you use her "4 at a time" method. You put your two fabrics right sides together, sew along all four sides, then slice in half diagonally - twice.  After that, she has you square the HSTs up:

IMG_8638TrimmingUpHuntersStarBlocks

It's a lot of work, but wow, does it make the blocks go together SO nicely!

Before I knew it, I was at this stage:

IMG_8640HuntersStarBlocks

Very happy with how it's coming together!  Tomorrow, I'll share some tips for making what could be a rather challenging, tedious quilt!  Stay tuned!

Thanks for reading!
KZK

Wednesday, June 5, 2019

Crossed Canoes

Hi everyone!  The first quilt I used my new pressing mat and cute iron for was a Crossed Canoes miniature!  I started this back so long ago, I can't even remember.  It's paper-pieced, apparently started before I knew how to print papers out by computer; I traced the blocks on tracing paper by hand.

Here's a look along the way:

IMG_8574CrossedCanoesMini

I think maybe I had three blocks done, and had stuffed the fabrics and papers into a baggie and forgot about them. Why? Because it's an insane block.

IMG_8576CrossedCanoesInProgress

And they're on paper.

Two-inch sub-blocks, maybe? What was I thinking?!?

I really want to wrap up old projects, though, so I stuck to it.

IMG_8577CrossedCanoes

I love having the little pressing mat right there!

Before I knew it, I had the blocks pieced and together:

IMG_8596CrossedCanoesMini

I decided it needed some tiny borders. I really don't like the navy/floral print, so I went with the muslin.

IMG_8612CrossedCanoesMini

I opted not to do a binding - just sewed right sides together with the batting and backing, then flipped right sides out. By putting a little line of machine quilting in there, it looks "binding-y" enough.

IMG_8619CamMagsCrossedCanoesQuilt

Clearly, the girls were impressed.

I had leftover papers; apparently I had planned to make this larger. I say a hearty "too bad" to the me of 20 years ago! 😁 Not going to happen. I did hang on to the papers for some ridiculous reason, though.

I love how it came out. I like how you almost get a curved effect as you look at the overall pattern.

Another old project DONE.  That feels good!

Thanks for reading!
KZK