Monday, April 30, 2012

Progress Report

The kitchen reno is moving right along!  Everything that had to be ordered is now in (except for the tiles for the back splash, which I understand are due in tomorrow), the electrician came by to scope out his parts of the project, and they're polishing our countertops!!!  I saw an iPhone photo of part of one of the counters and it looked amazing!  They will start the install this week!!!

So ... in the interim, while we were in the "some of the wood trim is missing and the bar top has been sawed off stage", I thought I should decorate the area. How does that expression go? "Say it with flowers"?

IMG_7762 flowers

I thought some Iris would accent the exposed drywall and garbage disposal switch quite nicely.  It didn't have the complete "wow" factor I was looking for, though, so I decided on this placement:

IMG_7759 Flowers

We had a houseguest at the time and I'm not sure he fully appreciated it.  I thought it was a nice touch, though. Coordinates nicely with both the wall stud and the quilt hanging in the dining room ... don't you think?  My lovely and helpful pups even blogged about it.  They DO have a remarkable work ethic.

Moving right along - I changed out the flowers after a bit.  The little quilt you see there is my "Pansy Star" quilt (you can see it on this post), so why not some paper pansies?

IMG_7800 paper pansies

I thought that was a winner!  I didn't want the basket to fall, so I thought painters tape would be apropos.  Adds to the overall ambience, don't you think?

But NOW... it's time to empty the kitchen!  Or at least everything out of the lower cabinets, off the counters, and remove the drawers.

IMG_7850 getting ready!

I'm getting there, slowly but surely.  Doesn't it look like I'm moving?  I feel like I am - and have some of the same emotions or thought patterns:  cautiously excited, knowing there's a whole lot of mess and hard work ahead, but anticipating a really cool new beginning.  I'm trying hard not to "squee".

I'll keep you all posted!  Until then, thanks for reading!

Tuesday, April 17, 2012

Kitchen Remodel, Part 2

I'm back today with some "in progress" photos for you - and pix of some of my choices for the new, improved kitchen.  :)  ("Before" pix were posted yesterday.)

For the countertops, we looked at all the wonderful choices out there and decided the right option for us is concrete!  There is a wonderful business here in town with incredibly talented builders/craftsmen/artisans that we've contracted for most of the work.  After describing to them our vision for the counters (and sharing some pix with them via Pinterest!), Jason came up with a mock-up sample of the counters he will be making for us!

IMG_7364 floor, cabinets, counter
Bird's eye view!  Counter mock-up, looking down on the cabinets and floor

I just love it and toted it all over town with me, so I could choose just the right backsplash to go with it!  (I put it in my Super Shopper Bag, by the way, which was a smart decision.  Did I mention concrete is HEAVY?!?)  I already had a vague idea of what I wanted, which helped tremendously.  Here's what I came up with!

IMG_7345 back-splash and counter
Bliss - Waterfall - by Florida Tile

I was also hauling around a spare floor tile.  This back-splash really ties it all together - floor (which isn't as dark as that top pic makes it look...), counters, and paint (White Fog). Very pleased with the choices so far.  Oh. And the sink, too!  I'll have a white Silgranit sink! I do love white! :)

OK... so... as I mentioned yesterday, we're removing the bar-height part of the counter and will have it all one level.  They needed to go ahead and saw that off (basically), in order to make an accurate template for the new countertops!  That's been done - and since Dave was still restricted to "no stairs", he got to supervise.

IMG_7379 Dave supervising
"Woo!  Good thing me and Zim didn't do that!"

His brother was downstairs in the office with my hubby, being a tremendous help to him, no doubt. Fortunately neither one of the boys are bothered one bit by loud noises.

Dave made sure they measured carefully during the templating process:

IMG_7380 Dave supervising
"Let me know if you guys need an extra paw, OK?"

He does have a lot of experience supervising me while I measure and cut in the Quilt Studio, so I'm sure he'd be quite helpful.  From his spot in the dining room.

And so... this is what the kitchen looks like currently:

IMG_7384 "during"

I can't explain how much just cutting that bar-top down has opened things up!  Also, removing the wooden quasi-back-splash was a big change and made the wall between the counter and cabinets seem bigger.  Those tiles are going to look so cool in there!!!  (I hope/think.)  They will go all the way up to the cabinets.

IMG_7382 "during"

It's mostly a visual thing; it makes the kitchen feel so much larger!

The switch that you see to the right of the paper towels is for the garbage disposal.  It will be moved inside the cabinet, under the sink.  There was also an electric outlet on that sort of demi-wall that held up the bar-top - that will be moved to the wall behind the cabinet drawers.  (It won't work to have it on the side because of the drawers; if it was a cabinet there, it would be a different story.  We did discuss having them install a pop-up outlet that would sink into the counter and disappear when not in use, but it just isn't the right option for me.)

That's all I've got for now.  They are building the forms for our counters and will hopefully be pouring them in about a week and a half - or the week after that.  We'll see.  Installation will come after the concrete  cures - and they'll do all the other work (tile, lights, sink, faucet, etc.) at that time.  I'll keep you posted!

Thanks for reading!

Monday, April 16, 2012

I'm Here ... Really!

For those of you who don't read the boys' blog or follow me on FaceBook, my apologies.  I really haven't dropped off the face of the earth.  I've got two major things keeping me occupied right now:
     1.  Dave, my Guide Dog for the Color Blind, as I mentioned in my last post, is recovering from some back and neck problems.  We're gradually letting him build back up, but haven't tried the stairs yet.
     2.  We're having our kitchen ripped apart.  Well, not exactly, but we are making some major changes in there - new countertops, adding under cabinet lighting, adding back splashes, and a few other things.  I've promised to show pictures to so many people that I think it will be easier to post them here!

I really like my kitchen, but some changes will really help out.  Here are a few "before" shots:

IMG_7376 "before"
From the breakfast room, looking into the heart of the kitchen 

IMG_7378 "before"
Basically, looking the other way ...

It's hard to get a feel for it from those pix, so I used one of the panoramic photo apps on my iPhone and took some more.  They're fun, if nothing else.

The first shot was taken from the breakfast room, panning from the built-in desk, into the kitchen, then you can just catch a glimpse of the dining room:

IMG_6965 Panoramic "before" shot

The desk top will be changed out, too, and will still match the kitchen counters.  The biggest change will be "straight ahead" in that shot.  See the bar-height part of the counter?  The guys are cutting that down, and the entire counter will be one height.  Still eat-at-able (my spell check let that one fly; isn't that great?), but lower.  We'll swap that stool with a lower one we have elsewhere in the house.

Changing perspective just a tad, let's look at shot #2:

IMG_6966 Panoramic "before" shot

I was standing in the doorway to the laundry room for that one above, just beyond the desk.  You can see the dining room, just beyond the kitchen wall, the door to the deck, and the breakfast room.  The door faces west, so we get tons of sunlight in there!  It's a bright kitchen, so I rarely use the center light fixture.  Having said that, when we had the house built, I asked them to install under cabinet lighting.  The builder looked at me like I was from the planet Neuxenius and was asking for Zackton gas to fuel my spaceship for the drive back home.  That was way back in ... 1998.  Yeah.  Stone Ages, apparently... let's move along.

Panoramic shot #3 was taken from the door to the living room:

IMG_6967 Panoramic "before" shot

Not much to say there, other than I didn't line my shots up very well, so there are blurry areas.  Oops.

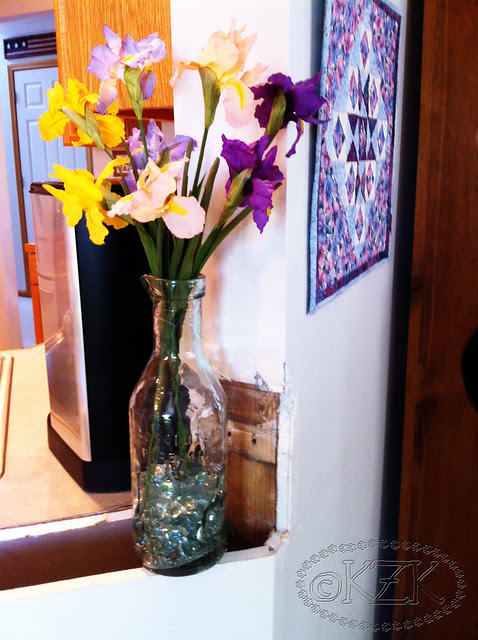
Oh, actually... see how we don't have back splashes?  There is a 4.5" wood strip where the counters meet the wall, but not an actual back splash.  We'll be adding one; I think it will make a great difference!

Pan shot #4 is in the same doorway, but giving you a look into the living room.

IMG_6968 Panoramic "before" shot

OK.  The photo above is really for my friend Shelli, the Macon Bag-a-holic.  Zim is in there on his bed, looking really adorable, and I knew she'd like this.  (Plus, she helped me name the planet Neuxenius and decide it was a spin-off from Neptune.  Seriously, how many of you have friends who wouldn't bat an eye when you text them that you're trying to make up a name for a strange planet and need their help?  The least I can do is post a picture of Zim being remarkably cute.)

Oh!  And look!  My Gettysburg Battle Flag quilt is hanging above the TV!  I love that my husband wanted it somewhere where we could see it all the time!  :)

The last of the panoramic shots is with my back to the door, shooting the whole scene:

IMG_6969 Panoramic "before" shot

That door to the right of the desk is to the laundry room -- machines are to the left, facing us is the door to the garage, and to the right, with my bags hanging on the handle, is the door to the pantry.

OK!  So ... those are the "before" shots!  I'll be back within a couple days to show you some of the choices I've made and some "in process" pix!  This is very exciting... albeit messy, a lot of work, and expensive.  It'll all be worth it, though.

Thanks for reading!
 (proud resident of the planet Neuxenius, finally getting that Zackton gas!)

Wednesday, March 21, 2012

Take Two

As I mentioned in my last post, I've temporarily stalled out on my Chain Link Runner; my Guide Dog for the Color Blind injured his back and isn't allowed to climb stairs for 4 weeks.  As my Studio is down stairs from the main living level, I've put machine work on hold for right now.  I can do some hand work while I watch over him.

Remember the runner I did with my friend Donna?  I did re-work the measurements and wanted to see if my math was better than that of the original pattern writer.  (Scroll down to the third and fourth pix in this post.)  Oy!  Anyway, I did some math, grabbed some junk fabric, and tested my pattern.  The good news is that my pieces actually matched up right, no "whacking off" at the ends, and I'm very pleased with the piecing.  The not quite as good news is that the fabrics I picked ... well ... check it out:

DSCN3231 Runner, Take 2

Yeow! I mean ... OK, I can't come up with anything better than "Yeow". (Dave thought the colors worked fine together, even if they aren't "our" colors, but even Zim, his brother, was a bit surprised by them. He made sure I took breaks from working on it. He's sweet like that.)  I just wanted to make sure my re-worked pattern would work out.  Note to self:  Trust your own math and don't go choosing a whacky color-scheme!

So anyway, I was able to sew the binding on this week. That's the front in the photo above. I used the same fabrics on the back. With spare parts. Because they aren't going to be used in anything else!!! Ever.  Take a look:

DSCN3229 Runner, Take 2

Would it be too redundant to say "Yeow!" again?

I do like how I sort of off-set the pieces on the back, though. That would be pretty cool to do for a top. In different fabrics.

DSCN3236 Runner, Take 2

Real different.

Here's another look at the front:

DSCN3233 Runner, Take 2

I think I reverse-sewed as much of the quilting as I put in.  I don't know what my problem was, but it was as though I'd never machine quilted anything in my life.  I'm happy with how it turned out, though - sort of like flames.  Here's a close up:

DSCN3232 Runner, Take 2

Yeow! ...but at least my math worked.

Thanks for reading!

Sunday, March 18, 2012

The Binding That ... Binds

Hmm.  OK.  Well, my work on the runner has been delayed a bit - but I did get my binding put together.

IMG_7112 Chain Link Runner

I'm using scraps from the yardage I cut.

I've had a few things come up and won't be in the Studio much for a bit.  I promise to get back to quilting the runner as soon as I can - in the meantime, I can dream up how I'm going to quilt it!

Thanks for reading!

Thursday, March 15, 2012

Chain Link Runner - Part 2

Welcome back!  (See Part 1 here.)  Let's get to the next step:

Layout and sewing:

Lay out your cut strips according to this chart:

ChainLinkNumbered

See how across from each 4-1/2” strip there is a pair of 14-1/2” strips?

IMG_7075

Sew each of those pairs together, putting them back where you got them after you sew and press. (Color placement is important - don’t get your fabs mixed up!) Use a long table, the floor, or a design wall.

IMG_7087 Chain Link Runner
You  might have to work in segments...

Now sew each pair to the corresponding 4-1/2” strip. For example, the 14-1/2” strip pair of fab 1 and fab 3 will be sewn to the fab 2 4-1/2” strip. It will make tons of sense as you go. And remember - odd numbers are on one side, evens are on another. Tape, tape, tape! You might think you’ll remember where each one goes, then get distracted by ... I don’t know ... a Siberian Husky who thinks you need a break. Just for instance.  Not that I had to do a little "reverse sewing" this very afternoon.  ...or perhaps I did.  Ahem.

Each fabric in the 14-1/2”/14-1/2”/4-12” groups is different!

IMG_7078

Also, sew the fab 1 14-1/2” strip to the fab A 2-1/2” square - and the fab 14 14-1/2” strip to the fab Z 2-1/2” square.

IMG_7080

Once you’ve got all those 14-1/2”/14-1/2”/4-12” groups together, and your 14-1/2”/2-1/2” groups together, put those ALL together to form your table runner. Nothing to match up ... just easy sewing!

IMG_7083 Chain Link Runner
Keep sewing groups to groups!

I couldn't believe how fast it came together!

Here's my top, all put together! 

IMG_7106 Chain Link Runner

Yea! Pretty cool, huh? Let's get the hubby to hold it up outside, for a good look at it!

IMG_7109 Finished top, Chain Link Runner
I the Kansas wind.  And my patient husband!!!

Let's find a calmer corner of the deck...

IMG_7108 Chain Link Runner
Finished Chain Link Runner top!

I've started piecing my binding; I decided it would be easier just to leave everything cut at 2-1/2", since I'm working from scraps.  I think a bit wider binding than I normally work with wouldn't be a bad idea for this runner!

Tomorrow, I hope to choose a backing and perhaps get quilting!

Is anyone else cutting or sewing yet?  Please remember to add your photos to the FlickR group!

Thanks for sewing along and for reading!

Chain Link Runner - Part 1

Who's up for a sew along?  A few of my FaceBook quilting buddies are in, so I thought I'd post the "tutorial" here.  We'll start today with the cutting for my original pattern for a Chain Link Runner!  I have set up a FlickR group for this, so if you do make the runner, please add your runner to the group!  I'd love to see yours!  (I've never started a group on FlickR before, so I sure hope I did that right!)

Here we go!

Chain Link Runner
by Karen Z. Kryschtal
ChainLinkPlain
A 16 x 60” table runner

All seam allowances 1/4”

Fabric requirements:

☛ You can easily do this runner from a Jelly Roll. You can get two runners from a Jelly Roll, binding included. If you’d like to cut yardage ...

For runner:
15 (2-1/2 x 35”) strips of different fabrics
OR 14 (2-1/2 x 35”) strips and 2 (2-1/2 x 17-1/2”) strips
For binding:
4 (2-1/4 x width of fabric) strips (or cut strips whatever width you like your binding by width of fab)
OR cut from your scraps
OR (if using a Jelly Roll) 4 more 2-1/2” strips from your roll

Backing - be creative! ☺
Batting - I like cotton

General needs:

You’ll need basic rotary cutting equipment, a good sewing machine, neutral-colored thread, a new sewing machine needle (always start a new project with a new needle!), pins, cool quilting thread, good music and/or something lined up in your Netflix instant queue, beverages of your choice (I recommend strongly brewed espresso roast coffee, black, no sugar, Diet Coke with Lime, or Crystal Light Iced Tea)... and other assorted sewing notions.

I also recommend masking tape or painter’s tape and a permanent marker.

Cutting:

From 14 of your strips, sub-cut the following:
2 (2-1/2 x 14-1/2”)
1 (2-1/2 x 4-1/2”)
From the 15th strip, sub-cut:
2 (2-1/2 x 14-1/2”)
2 (2-1/2” squares)
☛if you are using 2 17-1/2” strips, cut a 2-1/2 x 14-1/2” strip and a 2-1/2” square from each

If you want to cut your binding now, knock yourself out. 160” should give you plenty of leeway. I never cut mine until the end; that gives me time to change my mind 38 times.  I like creative bindings.

...And I never cut my backing until I’m done.

Here is my cutting process:

This is where I get the tape and marker out. I tag the fabs as I cut and lay them out, switching the order to get a color arrangement I like. Just be careful when you press things NOT to hit the tape!!!

IMG_7071 Number your fabrics!

Keep your colors separated! Make neat little piles somewhere.

IMG_7072 Number your fabrics
I'm using the same fab for my "A" and "Z" strips
From that 15th strip or 2 shorter strips, make two piles, each with a 14-1/2” strip and a 2-1/2” square. These will be known as “A” and “Z”. Number your other fabs 1-14. You’ll want some contrast between sequential numbers.

Get everything ready - layout and sewing come next!

IMG_7073 Number and lay out

Be back later with more!

Thanks for reading - and sewing along!

Saturday, March 3, 2012

Running With Donna, Part 5

YEA!  We're done!  We're done!  We're done!  Both of us!  This could be a record-fast finish for me!  :)  Donna and I each finished our runners on Thursday!  (If you need to catch up, click for Part 1, Part 2, Part 3 and Part 4.)

Without further ado, here's Donna's runner:

Donna's runner

Isn't it gorgeous?!?!  I love the soft floral center and the blue background!  To me, these are comfort colors.  You know, if you can have comfort food, why not comfort colors?  They just make you feel soooooo wonderful inside!

Here's how mine came out:

IMG_6882 Runner with Donna
My runner

And the reverse:

IMG_6883 Runner with Donna

At this point, I'd like to thank both of our husbands for being quilt holders. Are you guys smiling back there?

The colors on mine aren't as true in these next two shots, but here's how it looks on the table:

DSCN3172 Runner with Donna

(Note to self: Don't shoot in a west-facing room during the late afternoon.)

DSCN3174 Runner with Donna

I think it shows the quilting pretty well!  It was excellent practice!

This weekend, we're trying the pattern again - only I did some math for us that should make things come out a LOT more even.  Stay tuned and thank you again for reading!

Wednesday, February 29, 2012

Running With Donna, Part 4

I'm still working on my binding ...

IMG_6867 Table Runner with Donna

... but I'm getting there! In the meantime, how about a look at Donna's runner?!? I always love seeing how differently people can interpret the same pattern!

Here is Donna's runner, pre-borders:

Donna's runner

Notice how her side end-logs had to be chopped before she could add the short sides, as well?!?  Like I said, there were HBO words flying both here and in Northern Virginia!  We both followed the pattern VERY carefully, but as written, you have to fudge!  That's just not right!!!  Moving right along ...

I love the fabrics she chose - and how her lights are where my darks are, and vice versa!  Very cool!

She did some great quilting - a combination of free-motion quilting (she has a Bernina 440QE also!) and echo quilting) and chose a coordinating red fabric for her binding:

Donna's runner, as she does the hand part of the binding

LOVE it!

We're going to be doing this runner together again - but with some changes.  I did some math, a handful of test blocks, and think I've got it to where our side logs won't have to be whacked off to fit the center "panel".  Yes, math.  As in "the class the original pattern writer could have spent more time in".  (Insert eye roll here.)  Math is my friend - except perhaps for that third semester of calculus that resulted in me changing my major  ... but that's a different story altogether.  Anyway, I'll post pix of our progress - and we'll see how my math does for us.  :)

Thanks for reading!